


Ever since we moved into our house, I had wanted a play set for the kids. It was high on my priority list. Like top spot. Unfortunately, part of buying an old fixer-upper house meant that there were SOOO MANYYYY other projects that ended up taking priority over the play set. So here we were this past winter, over 2 years after moving in, discussing putting a play set in the yard. Again.
Me: “If I can’t get the kids some kind of play set this year, I will just die. Literally be dead. Can we please make this happen come spring? I have waited to long!”
Cody: “If you stop talking to me about it, then yes, this spring we will figure something out.”
So anybody that knows me knows that after getting this half-hearted yes from my husband, I basically became a play set architect. I immediately hit the internet and started shopping for play sets. I looked at hundreds. Kits you order online, kits you can pick up in store, kits that get delivered pre-assembled, kits that include lumber and kits that didn’t include lumber. I became an expert on pricing out slides and attachments. I spent every single second of my spare time comparing kits and pricing out lumber options. However, after days of shopping, I was just plain old disappointed. These play set kits were:
- BORINGGGG. Everybody I know has the basic one in their yard. I couldn’t even think about having a typical, standard play set.
- WAYYY TOOOOO EXPENSIVE. So the ones that weren’t boring and standard? Yea they cost way too much money. I’m talking thousands of dollars. So F that.
- Came with a beam for swings, which we didn’t need! We have a HUGE tree in our yard, and the first thing I made Cody do after we moved it was figure out how to hang tree swings. They kick ass, swing super-high and make every other swing on the planet look weak.
After this brutal disappointment, I had to go back to Cody and tell him my findings. We decided there was only one way to make this happen. Some good, old-fashioned DIY! (Which we love by the way. I blame HGTV and the DIY Channel. We are such suckers for anything DIY.) So with the full go-ahead from my project foreman, I hit Pinterest like was my full-time job, searching for inspiration. I pinned and pinned on my board “Outdoor Childhood”. (If you don’t follow me on Pinterest and Instagram, then you should! It will make your life better. Cross my heart.) Then I stumbled across this pin from Bella Cupcakes Blog. It took me to a post about this magical playhouse they made for their daughter, and I was so enchanted. After a few more searches on Pinterest, I found even more playhouses that just stuck in my mind. I couldn’t stop thinking about building this for the girls. I literally lay awake at night designing and decorating this playhouse in my head. It is safe to say, I became freaking obsessed with the idea of a playhouse for the girls. Any thoughts and dreams I once had of a standard play set were long gone.
POOF. Out the window.
The playhouse of my dreams (ahem, my daughter’s dreams…) was going to be built ASAP, or I was going to self-combust with creative energy that I had nowhere to channel.
I showed Cody all my pins from Pinterest, we picked a spot in the yard after HOURS of deliberations and Cody sketched out plans. We headed to the hardware store, with nothing but a hope and a wish that this thing would come together. After doing some research at the store, we came home and wrote up our plan. We guessed our supplies were going to cost somewhere in the $600-$700 range, which was music to my ears! Full steam ahead, Project Playhouse! Cody went and purchased the lumber and supplies that weekend, and we got started.
We decided on a location in the far right corner of our yard, and chose to build the playhouse in a lean-to style against an existing shed. This area was basically a corner of the yard that went unused most of the time, so having the playhouse there would tuck it out-of-the-way, without taking up any already usable space. Cody measured everything out, set some 4×4 posts in the ground and we were in deep! Too late to turn back now! After setting the posts, Cody built a sub-floor. Then he cut the posts so everything was level. The gray wall on the left of the picture is the wall of the existing shed.
 The sub-floor was 6 feet wide by 10 feet long, so he put down 6′ x 8′ plywood to make the floor of the house. The 2 front feet of the sub-floor was left open because it was going to eventually become a front porch! I love the picture below, because Avery was so excited this project started. I asked her what she was doing and she said, “I’m just gonna watch Dad finish my playhouse.” (Poor kid. Due to the rainiest, coldest spring EVER, it would be 4 weeks from when this pic was taken before this thing would be finished.)
 Framing up the walls….
 And once the walls were framed, Cody installed plywood sheeting as the base for the roof. (Note the horseshoe pit in front of the playhouse, because it eventually, magically turns into a huge sandbox! Wait for it….wait for it….)
 We hung some sheets of cheap hardboard siding to make the walls of the playhouse. I helped. I got splinters. I cried. Cody tried to kill me. Just another day in DIY bliss! This was the point in the project in which people who I showed this to thought we were crazy, and maybe thought we were creating a giant eyesore in our yard. Nobody EVER trusts my visions! Have faith, people! It gets SOOO MUCH better!
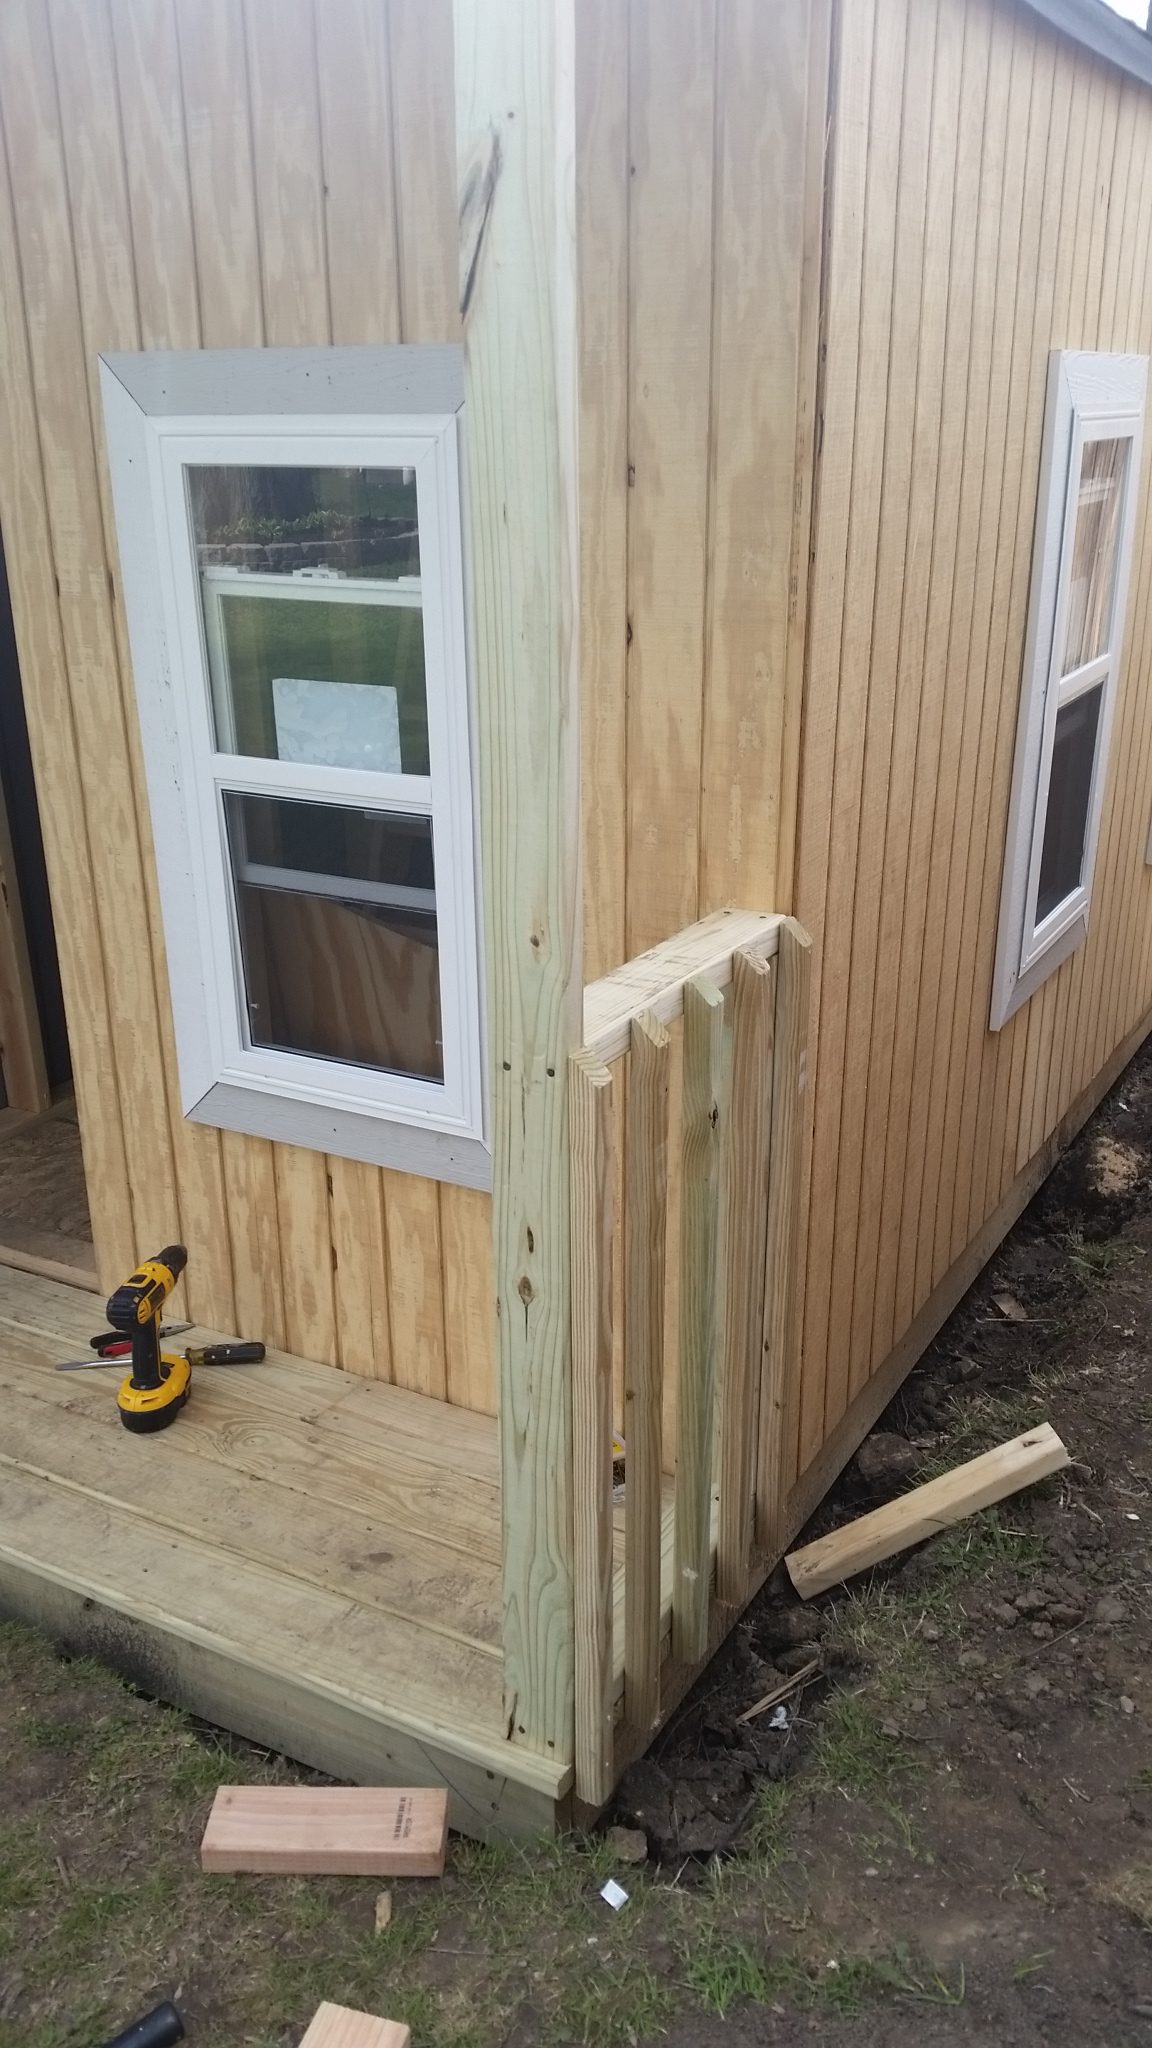
 So now that the walls were up, it was time to cut holes for windows. And then install working windows with screens. Because screens help keep out bugs, and bugs ruin playhouse fun with their disgusting existence. So rolling his eyes through it all, Cody agreed to 3 of these 18″ x 24″ shed windows we got on sale at Menard’s for $25 each.
 They really open and close, and are just all-around perfect and awesome. The kids are obsessed with them. (I am too!) Avery was clearly very excited that day!
 Then it was time to build the front porch and the railing, which came out pretty cute, if I do say so myself! We used some deck boards for the porch floor that we had left over from when we built our actual deck last year. Cody made the railing out of some pressure treated 2x4s and a few deck spindles that we got at Menard’s for $0.74 each.
  He also installed the shingles on the roof. We used up our leftover tar paper and shingles from when we re-roofed our covered porch, so even though we had purchased these previously, the shingles cost nothing out-of-pocket for this project. I was so glad to get that random pile of shingles out of my life! Then he framed the windows and ran a few pieces of outdoor composite trim along the roof line to keep everything looking clean.
 Once some trim was hung, Cody built the doors. I saw a lot of playhouses on Pinterest with cute, little, child-sized doors, but I insisted on a full-sized double-hung door. I am SO HAPPY with how it came out. The girls can open the top half and let in some light and air, but still be able to close the bottom half and play pretend to their hearts’ content. It also makes it much easier for adults to be able to access the playhouse, since the doorway is full-sized.
 So once the structure of the outside was coming together, it was time to get the inside going. I REALLY wanted a loft on the inside. Somewhere the girls could put baby dolls to sleep, read a book, just hide out and do top-secret girl stuff. Cody agreed (YAY!) that a loft could definitely increase the cool factor, and got to work building one.
 Once the platform for the loft was finished, he built a ladder out of 2×4 scraps and installed a railing along the side. Our little Emmy LOVES slides, and was desperate for us to come up with a way to give her playhouse a slide. I didn’t think it would be possible, but Cody came up with a way! Dad of the Year Award Nominee! See that hole in the back side of the playhouse from the loft? Yup. That’s a slide.
 Below is the view from the back! Emmy’s very own slide getaway! We lucked out on the slide, and found it at a Habitat For Humanity ReStore for $30.00! (If you aren’t familiar with ReStore, it is a thrift store for furniture, building supplies and home furnishings. I highly suggest stopping in to your local ReStore if you are into refinishing furniture or DIY projects!) That exact slide retails at $200.00 from the big chain hardware stores. I got it brand new, in box, in perfect condition, for $30.00. I love it when thrifting pays off!
 So now that the construction was starting to wrap up, it was time for me to go nuts. I literally vomited every ounce of creative energy I had stored up this winter all over this project. It was glorious. Step one: paint.
 The girls and I picked out a perfect Tiffany Blue, changed into painting clothes and got to work! They were over the moon to be let loose with real paint on their real playhouse!
 I barely had to do any work! Might as well enjoy a cold one while I wait for these kids to get the job done…..
 While I got my buzz on and the kids painted, Cody was hard at work converting the old horseshoe pit into a big sandbox. Remember how I told you to wait for it?! Here it is!
 He also used the timbers from the dissembled opposite pit to make a border edge for the play area. We knew we wanted to have mulch in the play area since our shade grass doesn’t hold up to high traffic.
 We lay some pavers down in a hopscotch pattern to make a fun little path for the girls as they made their way from the slide in back to the sandbox/front porch area.
  Cody also built a cute little door for the slide exit, which was no easy task! I was so impressed! The bottom of the door flips up so it can open/close over the top of the slide, then flips back down to keep out animals and weather. It really is pretty genius.
  Then the whole play area got mulched. We used 10 bags of mulch total, and they were on sale for $2.00/bag at Menard’s. We also bought the pavers there for $1.00 each. So the total we spent on landscaping for this project was right about $30.00. I think it was worth every penny, and then some!
 Since I wanted the whole backyard to feel cohesive, I used the same stain we used on our deck that we built last year to stain the girls’ front porch, the doors and the landscape timbers.
 Then I carried the stain inside the playhouse on the ladder and the beam for the loft. I figured the stain would hold up to traffic on the ladder much better than paint. Fun little tidbit: At this point, I kept the girls out of the playhouse so that I could finish decorating it. We let them back in a few days later once everything was finished, so that it could be a surprise!
 They weren’t too disappointed to be kept out for a while, since they got to lend a hand in refinishing some salvaged furniture for the inside. 🙂
 I painted the ceiling with some exterior paint in bright white, and painted all the walls with some interior/exterior recycled paint (It’s called “Everybody’s Paint” – and I have to say, I was surprised by how much I loved it! Click the link if you want details.) I found it at the ReStore last year for only $10.00 a gallon. I had come across a can that was the perfect shade of warm white, so I grabbed it thinking I would definitely find something to use it on. Turns out I was right! Another thrift shop payoff! Then I got out of Cody’s way so he could put down some cheap outdoor carpets. The total cost of the carpet and the installation tape was $40.00 at Menard’s. Here is a view of the loft area.
 To finish up the outside of the house and play area, I spray painted the hopscotch numbers on the path along the side of the house while Cody added benches to the sides of the new sandbox. Then all the trim got a fresh coat of bright white to tie in to the trim on our shed and actual house. You will get to see it below in the finished pictures!
 The girls and I also spent a rainy day making these AWESOME signs for the playhouse out of some scrap wood leftover from the playhouse construction. Look for them in the finished pictures! They turned out so cute!
 Once the outside was finished, I FINALLY got to pull out the bag of cheap decor the girls and I had been working on. Over the past few months, every time we visited a store we would check the clearance sections for cheap playhouse decor. We also had some good luck at dollar stores. I had built up quite a collection! I was thrilled to be able to put our bag of stuff to use! I had also decided to pull some toys from our house and turn them into playhouse toys. It was great to clear out some toy storage space.
 I painted the railing of the loft the same teal blue as the siding. We grabbed these cute frames at Ikea for $1 each. The popsicle pictures came in a pack of 5 for $6. So this decor cost me $11. Not too shabby!
  This mini-kitchen used to be in a corner of Avery’s bedroom, but we are in the process of converting her room to be a little more “big kid”. It made perfect sense to get this out of there and install a nice kitchen into their playhouse.
 This bookshelf was given to us free. Avery and I refinished it with some Amy Howard One Step Chalk Paint (Find it at your local Ace Hardware! It’s my favorite chalk paint for refinishing furniture!) in Graphite, and then glazed it with pale pink. It turned out super cute! All the dishes, picnic baskets and play food in the picture were also in Avery’s room with the mini-kitchen, so they moved out to the playhouse as well. I got those 3 adorable buckets on the bottom shelf at a consignment sale for 75 cents each!
 This old table was given to us for free, but was in awful shape. We tightened up all the legs with some new screws, sanded the spots where it was peeling, and then refinished it with the same process as the bookshelf. It also turned out awesome! The stools were from Ikea for $7 each. The centerpiece and little garden sign above it were each $2 at Walmart’s spring clearance. The tea set and cookie set we already had. The little teal blue placemats were part of the centerpieces at my wedding, and I was happy to find use for them in the playhouse for tea parties! The rug was a scrap Cody cut from the outdoor carpet he installed in the playhouse. I had 2 cans of spray paint (one teal and one sky blue) that I had used for other projects around the house. I used the last of them to make an ombre effect on the scrap of rug. Totally worth the effort! I love it!
 The popcorn vacuum, broom set, baby doll diaper bag, apron and chef hat also came from that little corner of Avery’s room. They all get much more use out here. Those little wooden hooks were in our baby nursery, but don’t match either of the girls rooms now. I’m glad I held onto them because they look perfect in the playhouse!
 The 3 windows have tension rods from Walmart that were $3 apiece. The curtains were originally in my kitchen. They are the Ikea LILL Lace curtains. You can get the pair for $5, and then cut them to the size of your window. I bought a fresh pair for my kitchen, and then cut the old ones to fit the girls’ windows. The pink sashes are scraps of leftover material from when I made curtains for Emmy’s bedroom windows.
The 3 paper lanterns were from Deals for $1 each. I just hung them from the same hook at different heights for a chandelier effect. The butterfly and dragonfly above the windows were each from Walmart’s spring clearance for $4 each. The little doll bassinet was from a garage sale for $5. The mini rocking chair was from ReStore for $10. I originally planned on refinishing it, but the teal seat and dark wood already matched the playhouse perfectly. All I did was dust it off and plop it in a corner! The loft area got a little fairy wall sticker from Deals for $1. The blankets are just a few old ones from the house. The girls use them to make doll beds or put them in the grass in the yard for pretend picnics. The 2 flower pillows were from Walmart’s patio section for $5 each. The White Sox pillow we already had inside, but we needed to represent Chicago’s south side in our playhouse somehow, so it is proudly displayed out there now. Go Go White Sox! 😉Once we finished the inside of the playhouse, we let the girls loose to take it all in! They were over the moon! Emmy said, “MOMMA! This is making me so happy! SOOO HAPPY!” I would definitely call it a success!
 Last but not least, I let the girls add the finishing touches we picked out for the outside. We hung the “Run Wild My Child” sign we made on the back wall, and found a good spot for the windmills ($7 each on sale at Menard’s) and pink flamingos (Set of 2 for $7 on sale at Menard’s) that girls picked out to spruce up the back of the playhouse. The front was finished up with the “PLAYHOUSE” sign we made, 2 FARGGLAD chairs from Ikea for $15 each and a little terracotta planter pot we already had with a sweet potato vine.
The total cost of this project came in at just under $800.00. That includes everything – building and landscaping materials, paint, furniture, decor, etc. I am thrilled about it, because not only is it perfectly custom and adorable, but it is HALF of what we would have spent ordering a play set kit! We did luck out in having some supplies on hand from other projects, but that is part of what makes every DIY project so awesome!
Now if this ain’t the playhouse of every kid’s (and parent’s!) dreams, I don’t know what is! Good times ahead for us this summer! 🙂